BASIC TAB READING
TAB is a simple way and another way to read music, and should be simple to write if you want to
submit a song(s) you have worked out yourself to send to others. People who cannot read music
usually learn to read TABS. The idea is this:
You start out with 6 lines (or four for bass). These lines correspond to the strings of the guitar
or other string instrument. The top line is the highest pitch string, and the bottom line is the
lowest pitch string. Below is a blank bit of TAB with the string names at the left.
E---------------------------------------------------------------- 1st string
B---------------------------------------------------------------- 2nd string
G---------------------------------------------------------------- 3rd string
D---------------------------------------------------------------- 4th string
A---------------------------------------------------------------- 5th string
E---------------------------------------------------------------- 6th string
What confuses me is that they are looking at these upside down! So this is important to remember.
Numbers are written on the lines to show you what fret of the string is fingered with the left hand.
If a (0)zero appears , this means play the open string. Like standard musical notation, you read from
left to right to find out what order to play the notes. The following piece of TAB would mean
play the sequence of notes (E F F# G G# A) on the bottom or LOW E string by moving up a fret at a time,
starting with the open string.
E----------------------------------------------------------------
B----------------------------------------------------------------
G----------------------------------------------------------------
D----------------------------------------------------------------
A----------------------------------------------------------------
E--0--1--2--3--4--5------------------------------------------
Here we have notes being played one at a time. If two or more notes are to be played together,
they are written on top of one another, again just like standard notation. In the next example
we have a G bar chord.
E----3------------------------------------------------------------
B----3------------------------------------------------------------
G----4------------------------------------------------------------
D----5------------------------------------------------------------
A----5------------------------------------------------------------
E----3------------------------------------------------------------
So this means play all these notes together as a chord.
You might see the same chord written like this:
E--------3--------------------------------------------------------
B-------3---------------------------------------------------------
G------4----------------------------------------------------------
D-----5-----------------------------------------------------------
A----5------------------------------------------------------------
E---3-------------------------------------------------------------
Which would mean strum the same shape starting at the bottom string, so that each string is hit
slightly later than the last string, but all notes will ring together. Below is am example of
the same shape again, but now the gaps between the notes are bigger - so you would probably pick
the strings separately instead of slowly strumming the shape.
E------------------3----------------------------------------------
B---------------3-----3-------------------------------------------
G------------4-----------4----------------------------------------
D---------5-----------------5-------------------------------------
A------5-----------------------5----------------------------------
E---3-----------------------------3-------------------------------
In time we will add more on Learning how to read tab, such as timing and other the letters/symbols.
However, lets move on to some information that I obtained from a web site. The URL of the
web site is stated below. I would hope that you would go on this site and get more information.
Write him an e-mail and let him know that it helped you if it did!
Guitar Tab, Neck Diagrams and Chord Diagrams
In order to take adavantage of the lesson materials provided on this site, you need to become
familiar with a few of the ways that guitar music is written. There are four conventional ways
of notating guitar music - standard notation, guitar tab, neck diagrams and chord diagrams.
Standard notation will be covered in depth within the lessons themselves while a basic knowledge
of tab and diagrams is essential before you start.
Guitar Tab
Guitar tab or tabulature is a very popular method of notating guitar music. What makes tab so
popular is that, once you get the hang of it, it is very easy to read. In order to understand
tab, you need to visualize a guitar neck laying on its side like so:

At first, this will seem upside-down to you, but this view positions the neck much the same way
as if you are playing the guitar and looking down on the neck. Don't worry, you'll get used to it.
Tab consists of 6 horizontal lines that represent the strings of the guitar:

The bottom line represents the low E-string and the top line represents the high E-string. So,
from the bottom line to the top line, we have low E-string, A-string, D-string, G-string, B-string
and on the top, the high E-string.
In order to tell you what notes to play, numbers are used:

This tab is telling you to play the note at the 5th fret on the low E-string.
Tab is read from left to right just like you're reading these words. So if you see numbers spread out,
it means to play the notes one after the other like a scale:

So, this tab is telling your to play the 5th fret on the low E-string, then the 7th fret on the low E, followed by the 4th fret on the A-string, 5th fret on the A-string etc...
If the numbers are stacked vertically, it means to play all the notes in each stack at the same time
like a chord:

So this tab is telling you to play an A chord (Chords will be covered in great detail within the
lessons. Right now you'll just have to take my word for it.), followed by a D chord, then an E chord,
and, finally, back to the A chord.
Now, notice the 0's used in each chord. 0 means to play the string without putting a finger down
on it. This is called an open string.
That's it! Everything else you will need to know about reading tab is covered inside the lessons.
Neck Diagrams
Neck diagrams work a lot like tab, but instead of lines and numbers, a neck diagram is a picture of
a guitar neck:
Just like tab, the bottom line represents the low E-string, and the rest of the strings follow in
proper order. The grey vertical strip on the left of the diagram is the nut, the vertical lines
are the frets and the diamonds along the length of the diagram are the position markers or "fret
dots". Scroll back up and take a look at the picture of the guitar neck if you are having trouble
with this one.
Neck diagrams are used for showing how scales and chords "lay out" across the fingerboard. A scale
can be shown like this:

A chord can be shown like this:

The squares and dots show you which notes are included in the scale or chord. If a square or dot lies
to the left of the nut, that marking represents a note played on the open string.
Chord Diagrams
Chord diagrams are exactly like neck diagrams except that chord diagrams are arranged vetically
instead of horizontally (honest....I'm not making this up just to confuse you). In order to read
chord diagrams, you will need to visualize the guitar neck in this position:


The sole purpose of chord diagrams is to show how chords are fingered (which finger plays which note):

Again the dots represent the notes to be played. Clear dots are open strings and the numbers underneath the diagram tell you which fingers to use for each note of the chord.
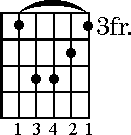
A chord played further up the neck looks like this:

"3fr." indicates that this chord is played at the 3rd fret. The arc over the top of the diagram is called a barre (pronounced bar). A barre indicates that you need to flatten your finger (index finger in this case) across all the strings inside the arc. To play this chord, you need to flatten your index finger across the A, D, G, B and high E-string in order for that finger to play the note on the A-string AND the note on the E-string.
If, after trying to play this chord, you decide to forget about learning to play the guitar and take up stamp collecting, you are not alone. But don't give up hope. With practice, anything is possible. If, on the other hand you find this chord quite easy to play, don't worry you'll get what's coming to you eventually. There are plenty of things down the road to challenge even the most gifted novice. Betcha can't wait :-)
There's one last thing you need to know about chord diagrams before you go diving head first into the lessons. Only strings that have a dot are played. If a string doesn't have a dot, don't play that
string. This takes a bit of practice on some chords, but if you don't leave those strings out, your chords will sound like crap and you'll think I don't know what the hell I'm showing you.
If the above information has helped you Please visit the below URL and send him a note that he was
helpful to you, thanks!
Thanks to: F.W. Lineberry and D.L. Keur at:
Learning Guitar

Copyright � 2005.
All Rights Reserved. All referenced brand and product names are trademarks,
registered trademarks or service marks of Guitartabs.


